如何在Telegram信使中创建ChatGPT聊天机器人 译文

愤怒的蜗牛

如今,提供ChatGPT访问的镜像网站开始出现,然而使用这些网站是不安全的,因为可以收集和分析所有的通信。尤其是那些完全免费访问ChatGPT的网站。这些网站之所以出现,因为一些国家阻止了访问ChatGPT,而OpenAI公司也阻止了一些国家和地区访问。此外,对于一些用户来说,20美元的ChatGPT订阅费用比较高昂。

如何在Telegram信使中创建ChatGPT聊天机器人 译文

而现在可以在Telegram信使中基于ChatGPT创建自己的聊天机器人。这很容易做到,在某些任务中,使用它可能比OpenAI公司的ChatGPT还要方便。

在这里将采用Python编写这种聊天机器人程序,并通过OpenAI API发送请求。

有些用户在注册ChatGPT时,OpenAI公司会提供5~18美元的体验费用。但是,即使是5美元,也足以让用户获得大约65万个ChatGPT v3.5令牌,这对于用户聊天来说是足够了。

相比之下,玛格丽特·米切尔的著作《乱世佳人》大约有42万字,列夫·托尔斯泰的著作《战争与和平》有59万字。

另外,API的运行速度比OpenAI公司的免费ChatGPT要快,而且不像OpenAI公司需要付费订阅(每月20美元)。使用OpenAI API,用户只需要为他使用的内容付费,如果没有很多请求,用户使用API可以节省成本。

虽然ChatGPT-4 API现在还没有向所有人开放,但是GPT-3.5版本也很好地解决了许多任务。

那么现在开始创建聊天机器人。

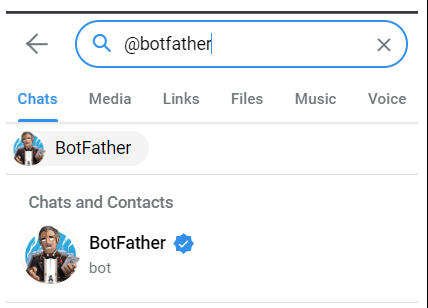
首先,需要创建一个Telegram BOT,为此需要请求Telegram BOT,采用BotFather创建一个聊天机器人。在Telegram的搜索栏中输入@botfather,打开它,然后点击“启动”。
如何在Telegram信使中创建ChatGPT聊天机器人 译文

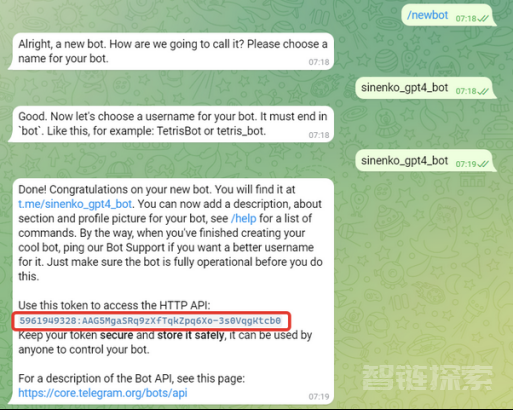
要创建一个新的bot,先写入/newbot,然后将被要求输入bot的名称,并提出一个唯一的名称,需要注意的是,它应该以单词“bot”结尾。

在这里将创建的bot命名为sinenko_gpt4_bot,因为很有趣的名字都已经被人所用。

接下来,需要指定用户名,它将代表用户的bot。它也应该以bot这个词结尾。

在这里起同样的名字——sinenko_gpt4_bot在此之后,BotFather将提供一个令牌,使用它来访问Telegram API。

如何在Telegram信使中创建ChatGPT聊天机器人 译文

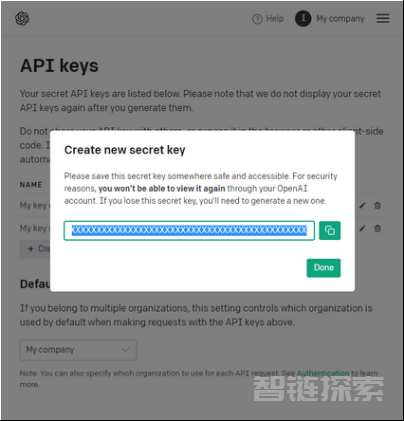
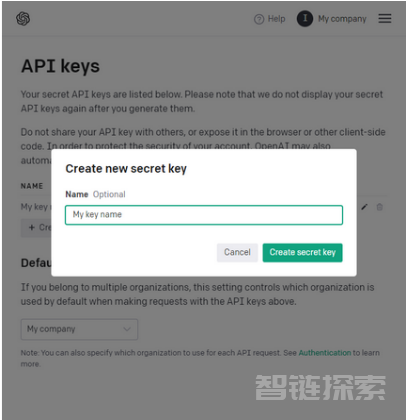
要从OpenAI公司获得ChatGPT的API密钥,需要遵循链接并注册。

在注册之后,需要创建一个新的API密钥并保存它。
如何在Telegram信使中创建ChatGPT聊天机器人 译文

如何在Telegram信使中创建ChatGPT聊天机器人 译文

现在采用项目创建一个目录,将其命名为TelegramBot。在这个目录中,创建了一个Python脚本。将它命名为bot.py。在这里将需要Python库:telebot、requests和JSON。但首先,在项目目录中创建一个新的Python环境(这不是强制性的步骤,但最好为每个项目创建一个单独的环境)。

打开终端,转到项目目录,然后执行以下命令:

Shell 
 python -m venv tbot_env1.2.

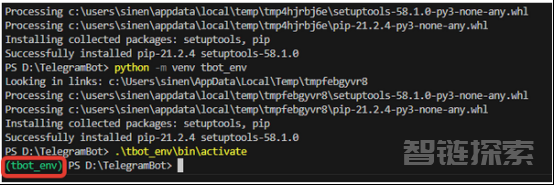
其中tbot是环境的任意一个名称。在成功创建新环境之后,项目目录中将出现一个带有环境名称的文件夹。在这个例子中,它是bot_env。现在需要通过运行激活脚本来激活它:

Shell 
.\tbot_env\bin\activate1.2.

根据系统和Python版本,激活脚本也可能在以下路径中找到:

Shell 
 .\tbot_env\Scripts\activate1.2.

在成功激活后,命令行中将出现一个带有环境名称的绿色铭文,在这个例子中是tbot_env。
如何在Telegram信使中创建ChatGPT聊天机器人 译文

需要注意的是,有时在Windows 8及以上版本,当激活环境时,会给出一个错误,禁止执行可执行文件。而要解决这个问题,需要执行以下命令:

PowerShell 
 Set-ExecutionPolicy RemoteSigned1.2.

之后,将要求确认,需要输入[Y]。

现在更新pip并安装工作所需的库:

Shell 
 python -m pip install --upgrade pip
 pip install telebot, mysql-connector-python1.2.3.

现在编写一个简单的Telegram bot:

Python 
 import telebot 
 from telebot import types


 bot = import telebot 
from telebot import types


 bot = telebot.TeleBot('TELEGRAM_API_KEY')


 @bot.message_handler(commands=['start']) # This decorator says that the next function should be called when the bot receives a message with the /start command.
 def start(message): # This is the definition of the start function. This function will be called when the bot receives a message with the /start command.
 markup = types.ReplyKeyboardMarkup(resize_keyboard=True)
 btn1 = types.KeyboardButton("Start")
 markup.add(btn1)
 bot.send_message(message.from_user.id, "Hi, I'm the Telegram bot ChatGPT!", reply_markup=markup)
 
 bot.polling(none_stop=True, interval=1) # for the bot to start "listening" or "polling" the Telegram1.2.3.4.5.6.7.8.9.10.11.12.13.14.15.16.17.18.19.20.

之后,用下面的命令运行脚本:

Shell 
 python .\bot.py1.2.

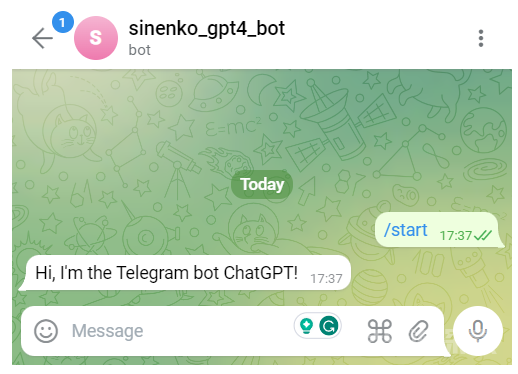
现在打开Telegram,并使用FatherBot给的链接与bot进行聊天。在这个例子中,它是:t.me/sinenko_gpt4_bot

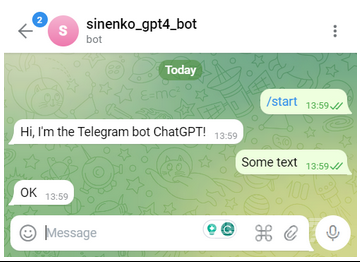
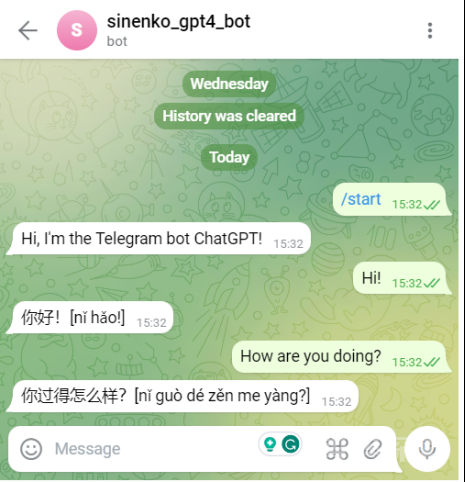
然后单击“开始”按钮或输入/Start命令。之后,应该会收到一条问候信息:“嗨,我是Telegram bot ChatGPT!”这意味着聊天机器人正在工作并成功处理用户消息。这段代码通过轮询函数工作,这意味着脚本本身将每秒访问一次Telegram服务器并检查是否有新消息。当脚本在本地计算机上运行或服务器在互联网上没有空白IP地址和域时,是非常方便的。
如何在Telegram信使中创建ChatGPT聊天机器人 译文

现在为用户输入的任何文本添加处理。为此,在start函数之后,添加以下代码,它将对用户输入的任何消息响应“OK”:

Python 
 @bot.message_handler(content_types=['text'])
 def get_text_messages(message):
 markup = types.ReplyKeyboardMarkup(resize_keyboard=True)
 bot.send_message(message.from_user.id, 'OK', reply_markup=markup)1.2.3.4.5.

现在测试这个聊天机器人并编写一些文本。

如何在Telegram信使中创建ChatGPT聊天机器人 译文

现在已经学习了如何接受来自用户的传入消息并给出响应。

现在需要将接收到的消息重定向到ChatGPT,并将其答案返回给用户。

要向API发出请求,需要以JSON格式向URL发送请求。

请求看起来应该是这样的:

Python 
 data = {
  'model': 'gpt-3.5-turbo', # Selected GPT model
  'messages': [
  {'role': 'system','content': 'You are my assistant.'}, # We specify the role of the bot
  {"role": "user", "content": 'some user message'}, # User request
  {"role": "assistant", "content": 'Answer of ChatGPT'} # Answer of the Chat-GPT
  ],
  'max_tokens': 1000, # Maximum number of tokens in the response
  'n': 1, # Number of text variants
  'temperature': 0.1 # Temperature (creative component)
 }1.2.3.4.5.6.7.8.9.10.11.12.

要向GPT聊天送用户请求,需要在消息数传递{"role": "user," "content": 'some user message'}

但为了让ChatGPT理解它在对话中的作用,也可以传递{'role': 'system','content': 'You are my assistant.'}

如果想让ChatGPT记住整个对话,那么所有过去的对话需要在每个请求中传递

{"role": "user," "content": 'first user message'},
{"role": "assistant," "content": 'first answer of ChatGPT'},
{"role": "user," "content": 'second user message'},
{"role": "assistant," "content": 'second answer of ChatGPT'},
{"role": "user," "content": 'some user message'}1.2.3.4.5.

但需要注意,令牌也用于发送所有前面的对话。

现在将用户消息转发到GPT聊天添加到我bot代码中

Python 
 import requests
 import json


 api_key_openai = 'OPENAI_API_KEY'


 url = 'https://api.openai.com/v1/chat/completions'
 headers = {
 'Content-Type': 'application/json',
 'Authorization': 'Bearer '+api_key_openai
 }


 data = {
 'model': 'gpt-3.5-turbo', # Selected GPT model
 'messages': [
 {'role': 'system','content': 'You are my assistant.'} # We specify the role of the bot
 ],
 'max_tokens': 1000, # Maximum number of tokens in the response
 'n': 1, # Number of text variants
 'temperature': 0.1 # Temperature (creative component)
}1.2.3.4.5.6.7.8.9.10.11.12.13.14.15.16.17.18.19.20.21.22.23.24.
Python 
 @bot.message_handler(content_types=['text'])
 def get_text_messages(message):
 markup = types.ReplyKeyboardMarkup(resize_keyboard=True)
 

 data['messages'].append({"role": "user", "content": message.text}) # Add a new user request to our dialog array, form a request to the server on behalf of the user, with the text received in telegram
 response = requests.post(url, headers=headers, data=json.dumps(data)) # Send a request to the server in json format
 result = response.json() # get the answer in json format and convert to an array
 print(result)
 bot.send_message(message.from_user.id, result['choices'][0]['message']['content'], reply_markup=markup) # Take the text from the array from ChatGPT and send it to Telegram
 data['messages'].append({"role": "assistant", "content": result['choices'][0]['message']['content']}) # Ad1.2.3.4.5.6.7.8.9.10.11.12.

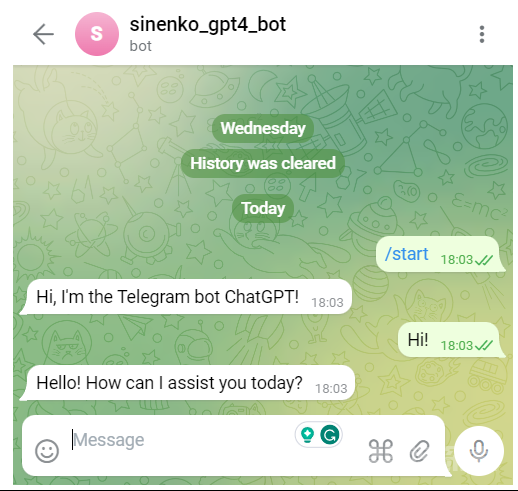
在运行脚本并尝试编写一些消息

如何在Telegram信使中创建ChatGPT聊天机器人 译文

在创建了一个功能齐全的聊天机器人之后,现在可以使用了。

API将发送整个对话;随着时间的推移,对话可能会变得很大,花费令牌将毫无意义,因此在发送消息之后,可以从消息数组中删除第一条消息。例如,留下最后40条信息。这就足够了。如果要清除旧消息,需要在发送消息后添加以下代码:

Python 
 # Delete the first element of the array if the array is longer than 40 elements, but leave the first element of the array, which is the initial text of the bot
 while len(data['messages']) > 40:
 data['messages'].pop(1)1.2.3.4.

如果消息超过40条,删除最早的消息,但第一条消息除外(因为第一条消息存储了bot角色)。

也可以把机器人的角色变成任何人,可以让它根据给出的句子写诗,编写恐怖故事或解决数学问题。为此,更改系统消息的内容字段就足够了。用下面的方法来改变它:

Python 
 data = {
 'model': 'gpt-3.5-turbo', # Selected GPT model
 'messages': [
 {'role': 'system','content': 'You are my Chinese translator, translate all messages I write in Chinese and write the transcription in square brackets using English letters.'}, # We specify the role of the bot
 ],
 'max_tokens': 1000, # Maximum number of tokens in the response
 'n': 1, # Number of text variants
 'temperature': 0.1 # Temperature (creative component)
 }1.2.3.4.5.6.7.8.9.10.

以下启动并检查操作:

如何在Telegram信使中创建ChatGPT聊天机器人 译文

顺便说一下,对于'messages'变量中的翻译角色,可以删除除了系统消息之外的所有消息。这将显著节省令牌,而5美元足够翻译30多万个单词。

本文展示了一个最简单的创建ChatGPT示例,并且这个聊天机器人可以无限地改进。还可以为每个单独的Telegram用户创建聊天分区,将其保存到数据库中,并添加广告和订阅。在API请求失败的情况下也缺少错误处理程序。

原文标题:Own ChatGPT Bot in Telegram,作者:Ilya Sinenko


您需要 登录账户 后才能发表评论

发表评论

快捷回复: 表情:
AddoilApplauseBadlaughBombCoffeeFabulousFacepalmFecesFrownHeyhaInsidiousKeepFightingNoProbPigHeadShockedSinistersmileSlapSocialSweatTolaughWatermelonWittyWowYeahYellowdog
评论列表 (暂无评论,309人围观)

还没有评论,来说两句吧...

目录[+]

取消
微信二维码
微信二维码
支付宝二维码